FriendlyArm NASDock V1.2
I have perfected my backup system for well over one year now (at the time of writing in 2018). All our most important files are now backupped up with Borg every day. And the resulting backup is copied to an external location. I can restore any version of any file which may have got lost or corrupted over the last year, no matter what happens. And the good thing is that it is all fully automated. I can’t forget it, and I won’t have to postpone making backups with the excuse of being too busy doing other things.
However my quite extensive video collection was too big to backup with Borg.
BTW, it is a bit of overkill to back it up with Borg anyway.
Video files don’t tend to change that often once they are stored on disk.
So I don’t need to go back in time to get a video file back from half a year ago, or something.
Anyway, I simply want to make an external backup copy of all of my video files, just in case something happens with the original ones.
Where To Store The Backups Externally?
At first I used Amazon’s unlimited storage.
I used the Linux CLI client rclone to keep the remote files synchronized.
It was all working perfectly.
I had some 8 TB of storage at Amazon for a fairly reasonable price of about $60 per year.
This setup worked flawlessly for about 5 month.
Until Amazon, with all of its wisdom, decided that there was a limit to unlimited storage.
Without prior notice they blocked API access through the rclone client.
Probably they don’t like third party solutions.
To cut a long story short, I’ve cancelled my Amazon subscription, got my money back and will never use Amazon services ever again.
Lesson learned.
So I had to find another solution to get my video collection stored off site, preferably in an automated fashion.
I hate it to carry hard disks around with the latest copy of my data, just to store it in someone else’s house.
I was in need of some sort of NAS system that I could reach over the internet.
At first I was thinking about deploying a Synology Diskstation at a friend’s house.
However that would require a rather big Synology, to replace his own one, with extra disks for my backups.
His own one only got room for 2 disks, leaving no space for my disks.
Friendlyarm NASDock
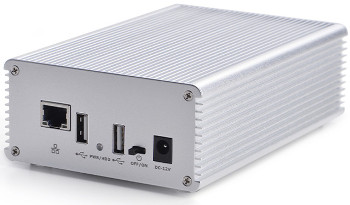
 And then I was pointed to a beautiful small NAS case from Friendlyarm.
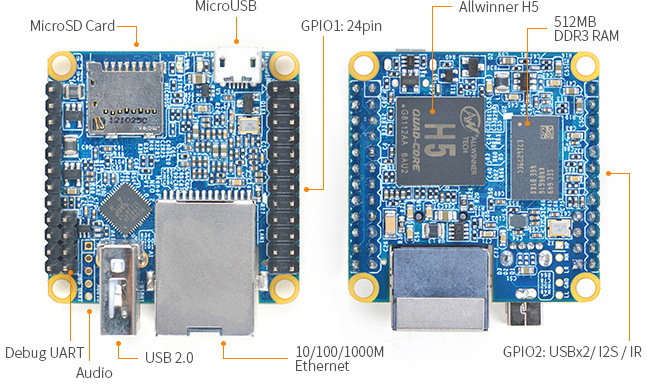
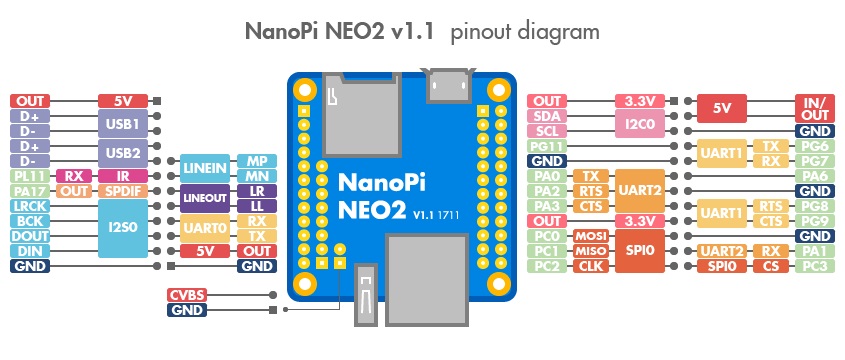
It is basically no more than a NanoPi Neo2 board plugged on to a base board containing a USB to SATA converter.
So I decided to order one NASDock from China.
Unlike with most Chinese suppliers, the package arrived within a week.
It was properly packaged and all taxes were paid.
Nothing to complain about.
All of this for about €42, excluding a hard disk and power supply.
According to the description on their website I had to do some of the assembly myself.
I had to solder some headers to the NanoPi Neo2 PCB and mount the heatsink.
However when you order the NASDock including the NanoPi Neo2 everything is already assembled for you.
All you have to do is to install the required software on a micro SD card (not included) and install the 2.5" SATA drive of your choice.
The board can accommodate any 2.5" harddisk.
Much to my surprise 2,5” harddisks come with capacities up to 5 TB nowadays, while still being quite affordable.
They won’t fit in a regular notebook, I expect, because the drives are considerably thicker than the ones I’m used to.
But that is not an issue for the NASDock though, not even if the drive was twice as thick as it already was.
So now I have a 4 TB NAS for about €150 total.
That is cheap enough to buy more if 4 TB appears not to be enough for you.
You can easily spread the load per NAS or host address this way.
As a side note I would like to add that the power supply inside the NASDock is powerful enough to power at least one more 2.5" drive, connected to one of the two external USB ports.
I haven’t tested adding 2 drives though.
I didn’t have enough external drives to test this with.
So you could add more storage to your NASDock if you’re not bothered about the extra cable clutter it adds to your setup.
 The NASDock also supports a hardware real time clock module.
This will allow the clock to continue running while the power is off.
For that you’ll have to add a CR2032 coin cell battery at the bottom of the PCB.
Personally I’m not interested in this feature and didn’t insert the battery.
My NAS is supposed to be always on and the time is synchronized using NTP anyway.
Another thing you’ll have to supply yourself, if you don’t order it from Friendlyarm as an extra, is the power supply.
The NASDock is powered by an external 12V power supply.
I tried it first with a bench power supply set to a current limit of 0.5A.
This was more than enough to operate the NASDock, which normally draws about 0.35A at full load.
However I noticed that the 2.5" drive hiccupped a couple of times before the device powered up.
Increasing the current limit to about 0.8A eliminated this hiccupping.
So I recommend you use a 12V power supply which can at least do 1A for your NASDock.
Warning: Always use a regulated power supply. Usually these are the switch mode types, which don’t generate too much heat. Lots of unregulated power supplies exist, containing no more than a transformer, a full bridge rectifier and a filter capacitor. These power supplies may deliver a nominal output of 12V, but the voltage can easily be 16V under low loads. The NASDock itself may survive this voltage, but your precious harddisk may not. Looking at the circuit diagram of the NASDock learns that they do have an over voltage protection diode across the power input, but they forgot to add a fuse. So if you do supply too much voltage to the NASDock the protection diode will simply get very hot and will eventually die, probably shorting the input voltage all together.

Some Modifications I’d Like To Make
Fortunately the circuit diagram is downloadable from the Friendlyarm web site because the NASDock is completely open source.
My intention is to have the NASDock to run 24/7.
That eliminates the usefulness of the power switch.
It’s easy enough to pull the power plug as it is.
I don’t need an extra chance of loosing power by someone accidentally knocking the power switch over to the off position.
A simple blob of solder across the power switch will do the trick of fixing it in the on position.
The NASDock is going to be placed in someone else’s house.
To my opinion the bi-colour LED on the front panel is very bright.
This may alarm my friendly host, who is willingly going to foster my NASDock.
Simply changing two resistor values will dim the brightness to a more acceptable level.
I have increased the value of resistors R1 and R29 from 100 Ω to 1 kΩ.
Studying the schematic I noticed that the input filter capacitor they used on the power supply is only 100 µF. I may be a bit old fashioned about this, but it doesn’t feel good to me. It may be a bit overkill, but I’ve added a 2200 µF capacitor across the power input.
Software
Openmediavault
For the software you can opt for Openmediavault, making a real NAS out of your NASDock.
You can download it here.
I have not tried this though, as I’m only interested in making it a simple remotely accessible harddisk.
It will most likely work, I have no doubt about that.
But whether it will be fast enough to serve your media files is unclear to me.
Mind you, the Quad Core NanoPi Neo2 really flies, compared to the original Raspberry Pi.
It even features a real Gigabit ethernet controller.
However it is the USB2 to SATA interface which is most likely going to be the weakest link in the chain.
I haven’t benchmarked the NASDock.
In my personal setup the weakest link will be my internet uplink speed.
So I don’t know if the NASDock, running Openmediavault, is going to be fit for your purpose.
Ubuntu Server
I simply installed Ubuntu server 16.04.2 LTS, which can be downloaded from the Friendlyarm web site.
It will work right out of the box and is basically all you need.
However I like to tweak things to my preferences.
Here’s what I’ve changed:
- Created a new user
- Deleted the default users pi and fa
- Disabled the root password (fa)
- Disabled root ssh login
- Set the timezone
- Set locales
- Installed the UFW firewall so the machine can only be accessed from my home
All these things are easy when you have a little Linux experience. Google is your friend in case you don’t know how to make these changes. But again, none of these changes are absolutely necessary. All required software is already installed. Basically all I need is ssh access, which is enabled by default, and rsync, which is installed by default.
Armbian
The Ubuntu Server ran for years without problems.
However I've noticed that FriendlyArm is a bit lazy in updating their software.
Therefore I have now switched over to Armbian.
It is a very good alternative for many single board ARM Linux computers, including the NanoPi Neo2.
Formatting And Mounting the Harddisk
I have bought myself a 4 TB Seagate Expansion 2.5" external disk. Using Gparted on my Linux Mint desktop machine, I have formatted this disk with an ext4 file system. This is way easier than formatting the disk with fdisk on the NASDock itself because fdisk can’t cope with 4 TB disks.
After that I have opened the Seagate case and removed the harddisk from it.
Then I have screwed the harddisk in place on the NASDock board.
Ubuntu server doesn’t automatically recognise and mount this new disk.
You’ll have to do that manually.
But don’t worry, we’re going to automate that.
Power up your NASDock and connect to it over ssh first. Then become root by typing:
sudo su
Create a mounting point for your hard disk:
mkdir /media/hdd1
chown <user>:<group> /media/hdd1
<user> and <group> have to replaced by the user and group name of the user who is going to have access to the NASDock.
Now find the UUID of your harddisk:
blkid /dev/sda1
/dev/sda1: UUID="blah-blah-blah" TYPE="ext4" PARTUUID="something-something-something"
The UUIDs shown here are just an example of course. Yours will be totally different. Now add the following line at the end of the file /etc/fstab, while copying your UUID into it.
UUID=blah-blah-blah /media/hdd1 ext4 rw,suid,dev,exec,auto,nouser,async,nofail 0 2
You could restart the NASDock now to make sure the disk gets mounted after a reboot. If you don’t want to reboot you can also type the command:
mount -a
And from then on you can access the files on your NASDock at /media/hdd1 .
Side Note
I had one particular Micro SD card which seemed to be working flawlessly. However once in a while the NASDock didn’t boot. After swapping the Micro SD card I have not witnessed this problem anymore.
Friendly Service
And the service from Friendlyarm is super. I have contacted them with a small insignificant issue with my NanoPi Neo2 and I’m very pleased with the way they’ve helped me.
 I have perfected my backup system for well over one year now (at the time of writing in 2018).
All our most important files are now backupped up with