Power Drill Battery Fix
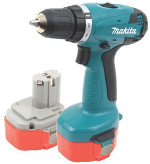 I love my Makita power drill, or Whizzer, or zz-zz's, or spinners, or whatever you want to call these things.
The build quality is great and the machine is as strong as an ox.
Although, come to think of it, I have never seen an ox fastening any screws.
Anyway, it's a great tool.
It is powered by a 14.4V, 1.3Ah NiCd battery pack.
Indeed not that LiON rubbish, still good old NiCd packs.
OK the capacity/weight ratio is a bit poor,but I used to get quite long life out of these packs.
My set came with two packs, so while one is being used, the other one can be charged.
And charging is rather fast, it takes only 30 minutes for a full charge.
So before the pack being used is empty, the other pack can be full again.
Usually these battery packs are quite maintenance free.
As long as you fully discharge them from time to time nothing much can go wrong.
This is a repair story, so obviously something did go wrong with my packs.
Did I overwork them? Nope.
Did I run them through all of their claimed charge/discharge cycles? Nope.
Didn't I discharge them completely from time to time resulting in the so called memory affect, which reduces the capacity of the pack? Nope.
I have been neglecting the batteries for well over a year.
After recharging I could drive some 10 screws in, after that the power tool lost most of its power.
So let's measure the battery capacity.
The capacity wasn't 100%, but not alarmingly bad.
But still the power tool was quite powerless anyway, with both battery packs.
How can that be?
Lazy Cells
It turned out that both packs had some lazy cells.
These cells have a very limited capacity, while others in the same pack were still at full capacity.
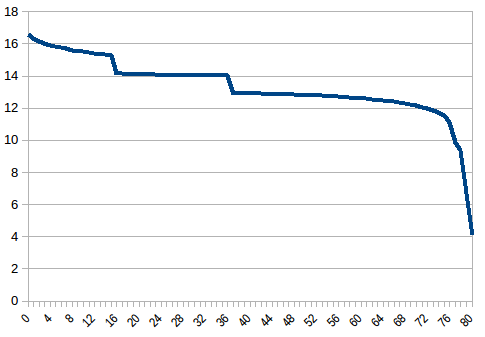
The capacity of the pack is measured by drawing a constant current of 1A from the pack, and measure the time it takes for the voltage on the pack to drop below 12V (is 1V per cell).
This graph shows that even with 2 lazy cells, the total capacity of the pack still was about 1.2Ah, whereas the nominal capacity was 1.3Ah.
Especially when using a fast charger even one single lazy cell can ruin the performance of the entire pack.
While charging, such a lazy cell will be the first to reach the full charge level, causing the charger to stop charging prematurely.
So because of this one bad cell, it is no longer possible to charge the pack to its full capacity.
On the other side, while discharging, the lazy cell is again the first one to be empty, which again ruins the performance of the entire pack.
So even with one lazy cell the performance of the entire pack is well below the nominal value. Can you imagine what will happen when there are multiple lazy cells in the pack? A simple battery capacity measurement doesn't show this, unless you have a look at the discharge graph.
Refreshing Failed
Sometimes, when you're lucky you can recover the pack's overall performance. You do that by slowly charging and discharging the pack a couple of times. This could allow all the cells to reach completely full and completely empty state. Hopefully this will balance all cells again.
The trick is to slowly charge and discharge the batteries.
And with slowly I mean at 0.1C or less.
Thus a 1.3Ah pack must be charged or discharged with no more than 130mA.
The idea behind this is that NiCd (and NiMH) batteries can be charged with such a low current almost indefinitely.
When a cell reaches its full state all extra energy will be transformed into heat.
And at 0.1C this heat doesn't kill the battery.
So with these low currents you can charge an unbalanced pack until all cells reach their full state.
A fast charger would not allow this, because it will cut off when it sees that some cells are already full.
How long should you charge a pack with 0.1C?
Simple, 0.1C x 10 = 1C, thus the pack should be full after 10 hours.
However since charging is not 100% efficient, some of the added energy will be translated into heat during the charging, you'll have to add some 40% of time to that, which results in a total charge time of 14 hours.
Sadly my packs didn't recover. I need a change of plan.
Buying New Packs
I soon found out that buying a pair of new packs really wasn't an option.
So instead I bought a completely new set, including the power drill and fast charger.
Now I have two identical power drills with 2 brand spanking new battery packs, at just €30 more of what I had to pay for 2 new battery packs.
If only I can revive just one of the dead packs, I will have 2 power drills with 3 batteries.
Quite handy if you have to change drill bits regularly.
Make One Healthy Pack Out Of Two Lazy Packs

The battery packs are glued shut, so I first had to figure out how to open these packs, without damaging them.
This seemed relatively easy.
Simply put a small flat head screw driver on the seam between both halves of the pack and give it a gentle tap to break the glue at that point.
Work your way around the entire seam that way until the glue is broken all around the perimeter.
Now you can lift the pack apart.
Later you can simply glue the two halves together again.
Now I had to find the lazy cells.
First of all I had numbered all 12 cells, so it was easier to identify them later on.
That also helped during the measurement of the voltages of each individual cell later on.
If you work your way from 1 to 12 you're sure you haven't skipped any.
Now completely charge the pack slowly at 130mA for 14 hours.
This ensures that all cells should be completely full, even the lazy ones.
After that start discharging the cells, with 200mA for instance.
Monitor the voltage across the entire pack and wait for it to suddenly drop by about 1V, which is proof of 1 cell failing prematurely.
Then measure the voltages on all the individual cells of the pack.
Mark the cell which reads about 0V as bad.
Continue this process until you see the voltage drop by 1V again, which is the moment the second cell fails.
Then find this second cell in the pack.
In my case only 2 cells were bad in one of the packs.
Do the same with the second pack. In my case the second pack was in a very bad shape. There were at least 2 or 3 cells which didn't even last 5 minutes of discharge. But hey, the other pack has only 2 bad cells, so I only need 2 good ones from this second pack.
Now I had to perform 2 cell transplants. I've picked the 2 best ones from the donor pack (the ones with the highest voltages during discharge). It's a good thing to wrap a rubber band around the pack to keep it a bit in shape during the transplant. After all the pack has to fit into the shell again after the transplant. And don't forget that you're working with live batteries! Shorting them out can create quite some sparks!
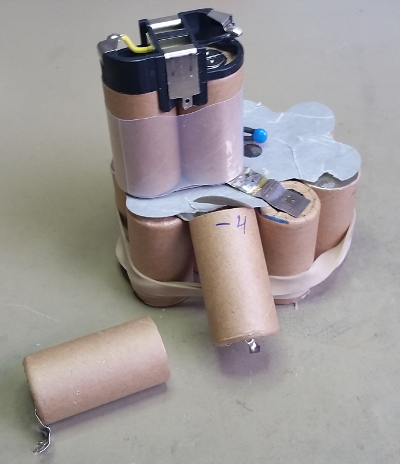
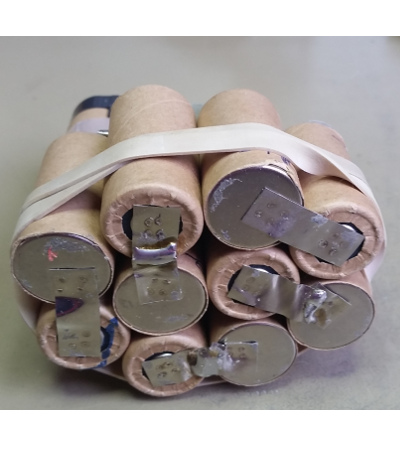
Be sure to leave a part of the tabs on the batteries you remove for transplantation and on the adjacent batteries where the lazy cells are in the pack you want to save. It is much easier to solder these tabs together than it is to solder a tab to the end of a battery. A battery dissipates most of the heat you add during soldering. This is not healthy for the battery, so keep the soldering time to an absolute minimum. Don't be tempted to use a thin piece of wire to connect adjacent cells together, because such a thin wire would later cause an enormous voltage drop when your power tool is at a heavy load.


After transplanting the cells you'll have to slowly charge the entire pack again to make sure that all cells are equally full.
Now is the time to measure the performance of the recovered battery pack.
So I discharged it at 1A to measure the capacity.
Alas, almost to the end of the discharge I noticed another 2 lazy cells.
I hadn't noticed them before because the other 2 bad cells were much more convincing.
Not to worry, I still had some more good cells laying around.
And after transplanting them I charged the pack slowly again and measured the capacity again.
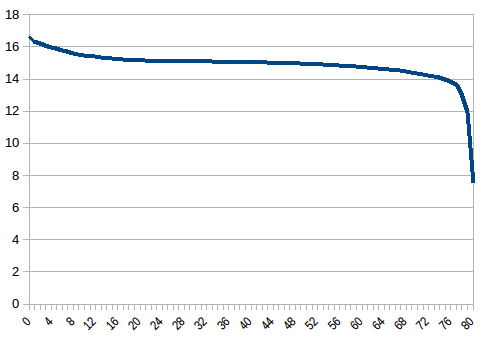
Now we're talking 1.28Ah, in a nice smooth discharge curve.
No lazy cells in sight any more.
I've repeated the capacity measurement again, but this time after using the fast charger which came with the power drill kit to charge the battery pack.
And again it reached 1.28Ah.
Not bad for such old batteries!
Now it's only a matter of keeping an eye on the batteries. And never to leave them idle for longer than about half a year. I have labeled the packs now, which makes it easier for me to keep track of their performance.
A Final Tip For Best Results
A battery pack performs best when all the cells are at equal quality and age.
In my case this was almost true because both packs were of the same age and all the cells are of the same type.
You can't expect good results if you mix cells of hugely different age and different types into one pack.
An alternative way to go would be to replace all the cells of a pack with new cells.
However don't think too lightly about joining the cells together.
New cells probably don't have any tabs spot welded to them yet.
So you'll have to make those connections yourself.
And unless you have a spot welding machine this could be quite a challenge.
